

How To Repair Wall After Removing Backsplash
Q&A /
Repair Wall Afterward Removing Ceramic Tile
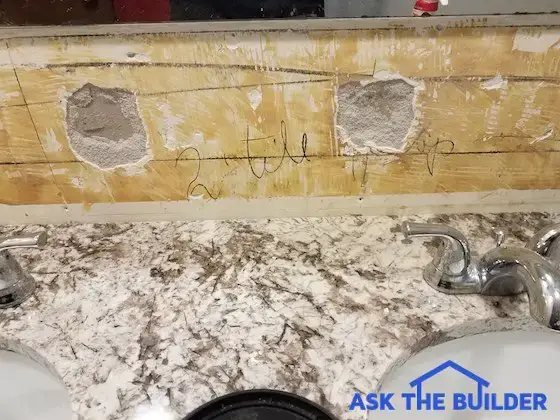
Here are the two monster defects in Pam's wall. Come across that uneven old yellowish agglutinative? It'due south got to go. Copyright 2017 Tim Carter
Repair Wall After Removing Ceramic Tile TIPS
- Wall must be apartment & smooth or tile will telegraph defects
- Do NOT employ cheap pre-mixed spackling or drywall mud for repair
- Lookout man repair videos below
- Patching compound MUST BE waterproof
- CLICK Hither to Go Tim'due south FREE & FUNNY Newsletter!
DEAR TIM: We're in the abode stretch of a delightful bathroom remodel job. One of the final steps is to install subway ceramic tile as the backsplash above the dual-basin sink.
The plaster wall above the new granite top needs to exist repaired. Later we removed the sometime ceramic tile there were behemothic holes.
My hubby is in a hurry and wants to exercise the patch fast with a pre-mixed product that comes in a tub from the local large box store. I desire your expert stance as to the best way to repair the massive depressions in the wall from where quondam trim tile pieces were removed.
Do we need to remove the sometime hardened mucilage from the walls likewise? Pam L., Columbus, OH
DEAR PAM: I'm humbled that you feel the good opinion will emanate from my fingertips as I blazon this!
Countless Wall Repairs
The truth be told I've been in the exact situation you're now facing countless times while working in paying customers' homes. The tile style changes from year to year, but the method of getting the wall ready for the tile has non changed.
High-Gloss Tile Shows Wall Defects
Allow's first talk nearly high-gloss finish ceramic tile first before we become much further. Nosotros need to do this to slow down your husband so he keeps the cardinal out of the car's ignition as he tries to get to the big box store.
Accept you always noticed how a pocket-sized paring in the door of a new auto stands out like a sore pollex? The paint may not be chipped or scratched, but you tin clearly see the in depression.
Costless & Fast Bids
CLICK HERE to get FREE & FAST BIDS from local tile contractors who can do this repair for you.
Light Reflection
This happens on high gloss surfaces like car paint because the reflected light off the metal is bent past the paring. In other words, high gloss finishes are unforgiving if the surface beneath the gloss is non in the same plane.
Wall Must Exist Flat & Smooth
If you want every aspect of your bath remodeling to be gorgeous, you need to be sure the wall surface under the tile is non only perfectly smooth, it needs to exist in the same airplane. If the subway tile pieces are not in the same plane on a apartment surface, they'll reflect light differently and it will look like a drunk tile setter installed them.
Repair Wall Early
I see by the photos y'all sent that the new granite peak and faucets are installed. This is going to make the job of repairing the wall much harder equally y'all work around these finished items. The wall repair should have been done long earlier the cabinet, meridian and faucets were installed.
Chain Of Adhesion
Yous also need to be concerned with what I call the chain of adhesion. What's that old saying? "A chain is just every bit strong equally its weakest link." I tin can clearly see in your photograph that you've got traditional plaster applied to gypsum board panels nailed to the wall studs.
For the tile to stay affixed to the wall for decades, the bail between all the wall elements needs to be equally strong equally possible. The pre-mixed compounds I meet in the large box stores contain very weak glues in almost all cases. What'southward worse is some of the glues in these products are water soluble. Premixed drywall joint chemical compound and common spackling are great examples of products with these weak glues.
Cheap Products Non Waterproof
In one case these two products are dry, y'all tin can dissolve them by rubbing them with a wet sponge. Rub your plaster walls for days with a wet sponge and nothing happens except for you getting blisters and sore muscles. Plaster is waterproof and it bonds tenaciously to just about annihilation.
Remove Quondam Agglutinative
Here's how I'd proceed to make your walls gear up for the stunning subway tile I'grand sure y'all've selected. First you need to buy some liquid adhesive remover.

Here's a great adhesive and mastic remover. Don't use simply any adhesive remover. It needs to say information technology's made for tile mastic. CLICK THE IMAGE At present to have this delivered to your home in days.
This production brushes on much like liquid pigment remover. information technology's imperative you protect the granite superlative and faucets and any other finished item like the front end of the vanity cabinets from this harsh chemic.
CLICK HERE to get Free & FAST BIDS from local tile contractors who tin can do this repair for you.
Follow Directions
Follow the directions and get all the old yellowed tile glue off the plaster exposing the original white lime finish plaster. In one case it's off, at present it'south fourth dimension to start to repair the deep depressions.
Traditional Base Plaster
Buy a bag of Structolite base of operations plaster. You can get this online or from a local building supply store. Exist sure the holes in the wall take all loose cloth removed and brush away and grit.

This is a fantastic gypsum base of operations-coat plaster. You just mix it with water and it actually sticks to wallboard and other old gypsum plaster. CLICK THE IMAGE NOW to have this bag at your doorstep in days.
Mix upwardly the Structolite plaster per directions on the bag. You desire information technology to exist the consistency of somewhat stiff applesauce.
Structolite Mixing Video
Lookout this video to see how to mix Structolite. For small amounts you can but mix past paw with a potent 3-inch broad scraping knife.
Take a wet sponge and lightly pat the quondam base plaster in the pigsty to get it slightly clammy just before yous're ready to utilise the Structolite. Pack in the new plaster beingness certain to go along the new plaster one/8-inch lower than the existing white lime plaster stop you exposed one time you removed the old mucilage.
Use a straightedge to ensure the Structolite is lower than the old white lime plaster. Let the Structolite to cure for one day.
Finish With Durabond 90
The next day fill in the slight depression and all other tiny holes in the plaster wall with Durabond 90. This is a dry-setting articulation compound that's much like the white lime terminate plaster on the wall.
Mix information technology with water to the consistency of warm block icing so it's silky smooth. You only have ninety minutes to work with it before it gets hard. You can use cold water to tedious the hardening process.
Take your time and be sure the wall surface is as smoothen as glass and in the same plane. Use a long straightedge or metallic level to help yous locate small depressions that may exist in the old white plaster terminate. Fill those with the Durabond ninety product so the final surface nether the new subway tile is as flat as possible.
Durabond 90 Video
Spotter this video to get an idea of how to work with quick-setting plaster or setting compound.
CLICK HERE to get Gratuitous & FAST BIDS from local tile contractors who can do this repair for you.
Related Column: Tile Setting on Common cold Surfaces
Cavalcade 1213

Source: https://www.askthebuilder.com/repair-wall-after-removing-ceramic-tile/
Posted by: coriacommandsone.blogspot.com
0 Response to "How To Repair Wall After Removing Backsplash"
Post a Comment